How to Measure Your Yard for a Dog-Proofer Fence System
Creating an escape-proof space outdoors for your dog may seem like a complicated undertaking, but it doesn’t have to be difficult! Follow our guide below to help you determine which Dog-Proofer System(s) are best for your yard and how much fencing you need to get the job done.
Step 1: Determine which Dog-Proofer System(s) you need
We offer dog fencing solutions for nearly any yard of any size - from a postage-stamp lawn to a multi-acre property. However, the particular system you need to secure your outdoor space for your dog(s) will depend on some of the elements of your yard and the abilities of your dog. There are two main types of fencing systems you can choose from:
The Freestanding Fence System
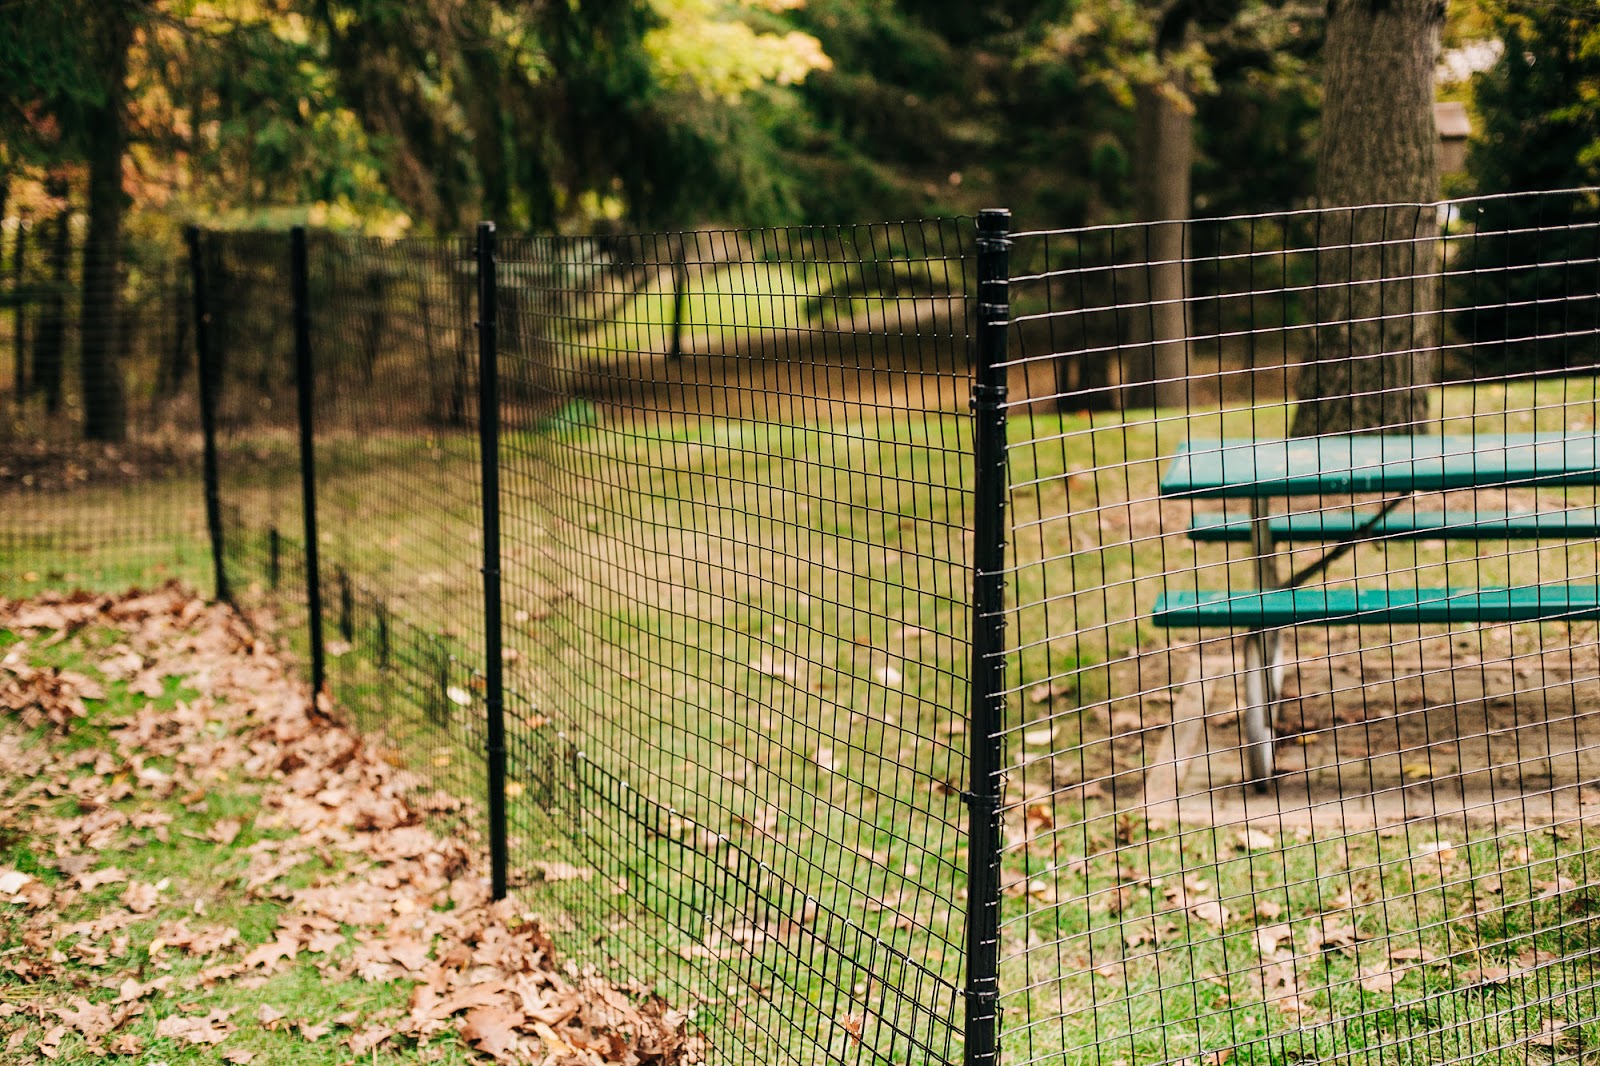
The Dog Proofer Free-Standing Fence system is a durable and cost-effective way to safely contain your dog! Dog Proofer's DIY Dog Fence is the most versatile system on the market! It can be easily installed nearly anywhere to create a safe, strong, and low-visibility dog-proof barrier. With height options ranging from 4.5 to 7 feet tall, and using chew and impact-proof welded wire mesh fence material, the Dog Proofer Freestanding System is the premium humane, and effective way to give your dog a safe, long-lasting, outdoor play area!
Existing Fence Modification Systems
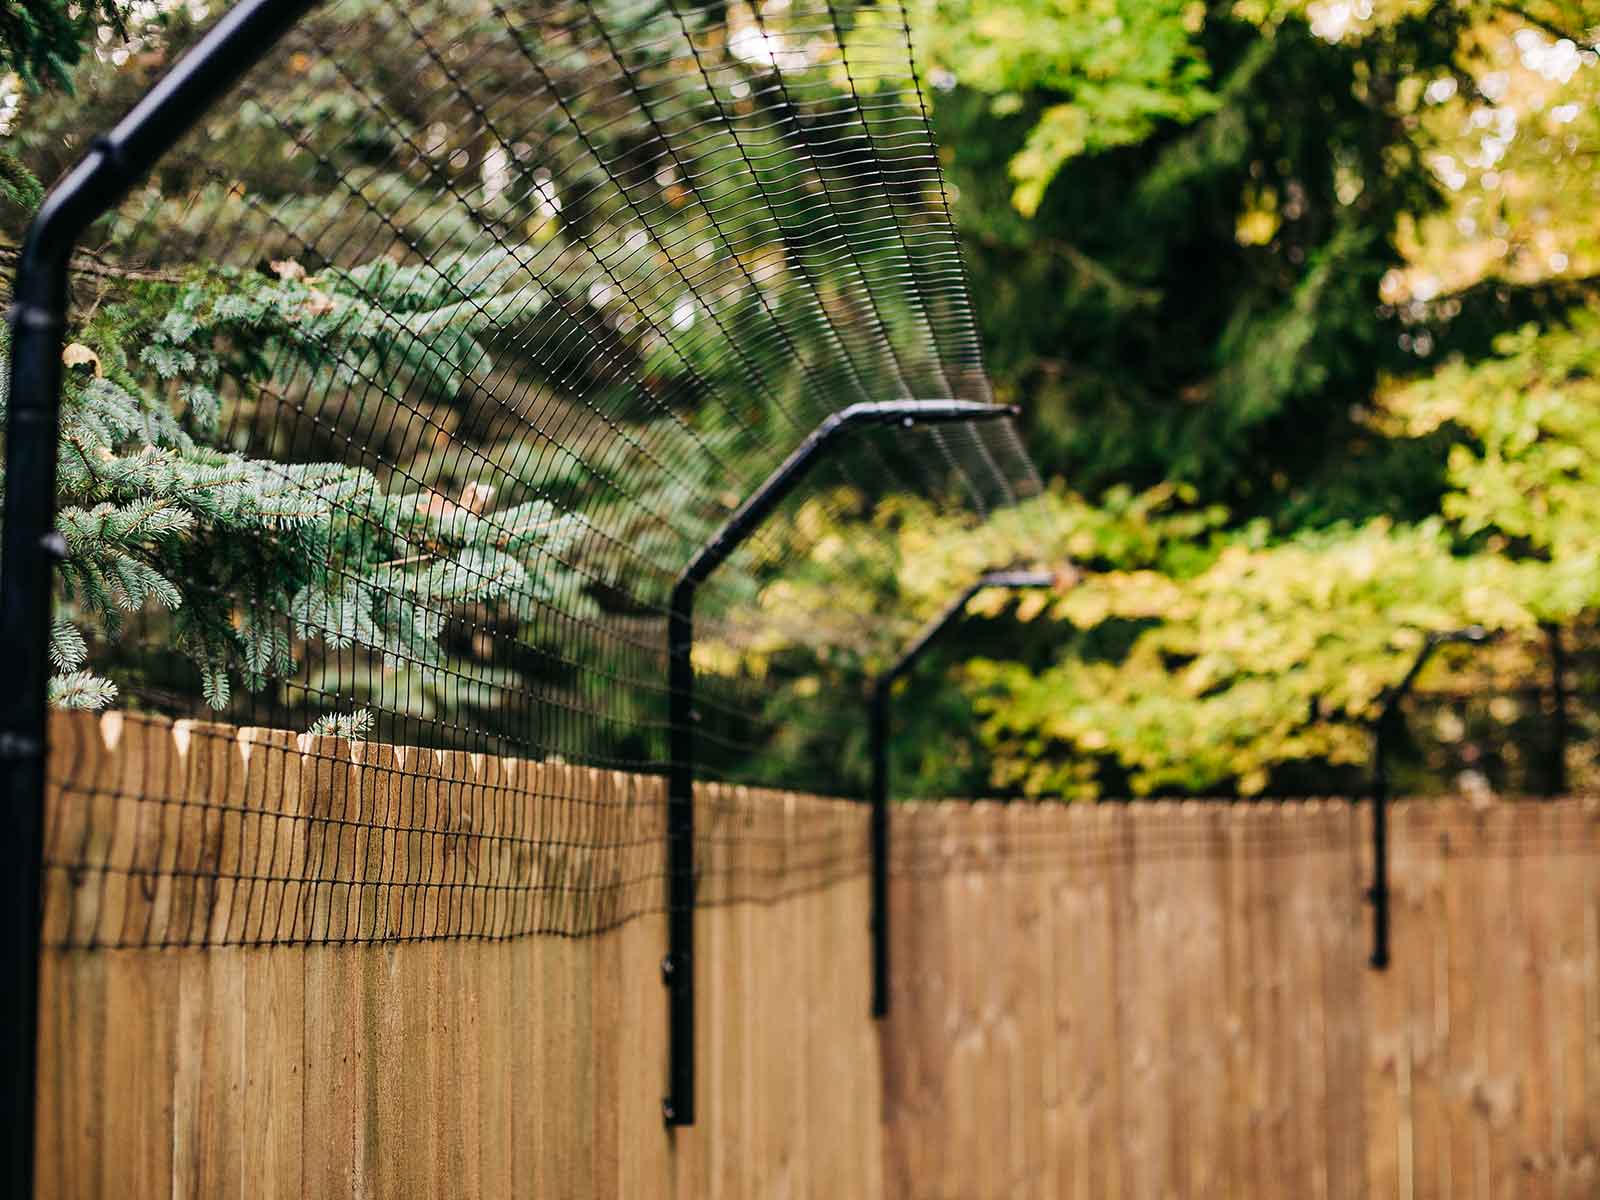
If you have an existing traditional fence surrounding your yard, then you can simply dog-proof the fence by adding a Dog-Proofer Existing Fence Kit to your fence. We have two versions of fence extensions that are designed to prevent jumping/climbing over fencing regardless of the construction or material.
The Straight Extensions are for dogs that only jump and have not learned to climb the fence. They can increase the height of your existing fence by up to 3 feet.
The Houdini-Proof Curved Fence Extensions are for instances where the dogs can climb as well as jump. These extensions increase the height of your fence by up to 2 feet.
Both systems are available with either our durable poly mesh fencing material or our heavy-duty welded wire mesh. The poly mesh is very durable and easier to install, however, if your dog might claw or try to rip it with their teeth, we would recommend using the welded wire material instead.
In some situations, you may find that you need a combination of systems to properly secure your yard. This may be due to varying heights of your existing fence(s), gaps within your existing fence, obstacles that need to be excluded from within the enclosure area, or if you are simply securing just a portion of the already-fenced area of your yard.
If your dog is slipping through gaps in your existing fence, the Wide Gap Barrier Dog Fence Kit, will prevent this. The heavy-duty welded wire comes in 24” or 42” high versions and will work with almost any fence type.
For dogs that are digging under to escape, you’ll want to reinforce your fence with our Dig Proofer Kit. We have our standard 24” height and XL 42” heavy-duty welded wire to produce the no-dig barrier for your fence type.
Obstacles to Consider
When planning your installation, it is important to take into account any obstacles along the existing fence or within the freestanding fence area. These obstacles could be trees or outbuildings that may interfere with installation. They may also be objects that could be used as escape aids if the dog can climb on top of it and continue to jump over to escape. If you find yourself stuck, you can always reach out to our planning team for help!
Step 2: Take Measurements
After you’ve determined which fencing system(s) you need and how to address any potential obstacles, you can now measure the perimeter of the enclosure. There is no single correct way to take measurements, and your preferred method might vary depending on the equipment you have available. Generally speaking, the easiest way to take measurements is with a helper and a tape measure.
Tape measures come in a variety of lengths, but in order to collect the most accurate measurements, we recommend a long tape measure on a spool if you have one available to you. This tool allows you to measure a full side length at a time for most enclosures. But if you don’t have a long tape measure, you can still take measurements with a standard, compact measuring tape!
Before you get started, the following items will be helpful:
-
A helper
-
A pen or pencil and a piece of paper
-
A measuring device
-
For Freestanding Fence: Location markers
If you will be measuring for a Freestanding Fence enclosure, we recommend that you first walk and mark the perimeter before measuring to ensure you have the fence line placed precisely where you’d like it. Mark each corner or turn with an object (such as a stick, rock, flag, spray paint, etc.). This will allow you to make any adjustments as needed before putting in the work of measuring! For long spans, you may place objects between corners to keep a line of sight down the proposed fence line. After the perimeter has been determined, start the measuring process.
For all fence types, start by drawing a rough sketch of the perimeter of the enclosure area and mark the locations of any gate locations. Next, pick a starting point (generally starting at a corner against a house or building tends to be easiest) and measure your perimeter one side at a time. If you have a long spool measuring tape, have one person hold the end of the tape at your starting point while the other person walks down the fence line to a gate or a corner. Make note of the length on your sketch.
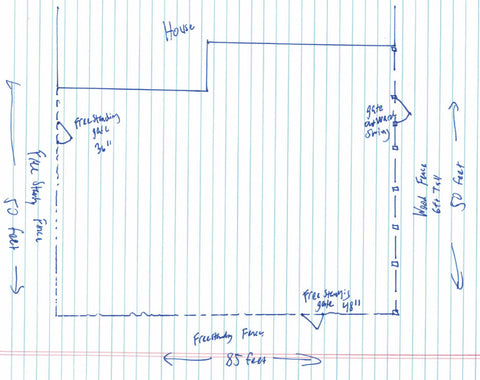
When you come to a gate, measure the width of the gate and note it as well, then measure the next length of the fence from the gate to a corner and note it on your sketch. After you reach a corner and mark the necessary lengths, move the end of the measuring tape to the corner, and measure the next side length of the enclosure. Continue measuring and marking each measured length on your drawing until you’ve measured the entire perimeter. If your enclosure has a side that is made of a home or building, it is not typically necessary to measure the length of the home or building. But do be sure to measure lengths around any obstacles!
If you do not have a long spool measuring tape, you can use a standard, compact measuring tape. These tapes come in a variety of lengths (usually no greater than 50 feet), so there are a couple of ways that you can use one to measure your enclosure’s perimeter:
Option 1: For existing fences, you can divide your fence into smaller segments and measure those. For fences with fence posts, you can measure from post to post. While this method may be more time-consuming, it can be helpful as it will allow you to simultaneously count your posts! For this method, measure from the center of one post to the next and note each measurement on your drawing. If your measurements are not exact, no worries! We will account for that later!
Option 2: For existing fences or Freestanding Fence layouts, you can use the full length of your measuring tape on long spans of the fence and multiply it out. One person will hold the end of the measuring tape at your starting point and stretch the tape to its full length, mark that location then bring the end to that point and stretch the tape out again. Keep track of the total number of times you are able to stretch the tape out fully, then add the final partial measurement.
For example, you have a measuring tape that is 25 feet long. You start at the fence corner and are able to stretch the tape out fully 3 times down the span. Then, your final partial length measurement is 12 feet. In order to determine the total length you will multiply 25 feet by 3 (25 x 3 = 75) then add your partial measurement to get the total length of 87 feet for the span (75 + 12 = 87).
After each side length has been measured, you can add all of the lengths together to get your total fence length. If you will be combining systems, it is important to calculate those lengths separately and be sure to mark the different system locations on your drawing.
Finally, we recommend that you add 10% to your measurement(s) to account for any potential measuring errors and waste that may be cut away during installation. To calculate the length that includes an extra 10% use the following formula:
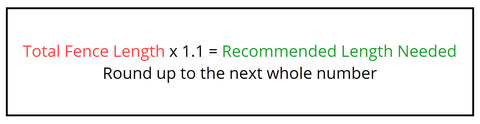
For example, you’ve measured your total fence length to be 133 feet:

Step 3: Determine the total number of posts for a freestanding system or extensions for a fence extension system are needed
Now that you know the total length of fencing you have, you should be able to select the corresponding kit size that will work for securing your yard. In the example above of 147 feet, you would select the 150 ft kit. Kits are available in increments of 50 ft and will include the average number of posts or extensions needed for the kit length.
For the Existing Fence Extension Systems, we recommend spacing the extensions between 8-12 feet apart. For most fence types, this will work out to be one extension on each of your fence posts because the majority of fences have posts spaced similarly.
For the Freestanding Fence System, you will install your posts up to 9 feet apart. This is the maximum distance allowed between posts, and the distance used to calculate the total number of posts that are included with the kits. You can certainly space posts closer together if it is necessary or preferred, but you may require additional posts for this type of adjustment.
You can also use the drawing you created in step 2 to mark the locations where you will be placing the posts. This can help give you an idea of how many posts will be needed on each side of the fence.
Corners
There are no special components required for corners. Both our freestanding and existing fence extension systems will use the same posts or extensions at corners as they would along the fence line.
Our Corner Adapter for Houdini Dog-Proofer Arms allows the arm to be secured to a corner post pointed in at a 45-degree angle which is necessary to walk the fence material around a corner. For each corner post you need to mount an arm to you will need 1 of these adapter kits.

Endpoints
Many layouts will include at least one point where the Dog-Proofer Freestanding Fence runs up to and meets the wall of a home or other building. These posts will be attached to the building with our post-to-wall straps rather than inserted into the ground with a ground sleeve.
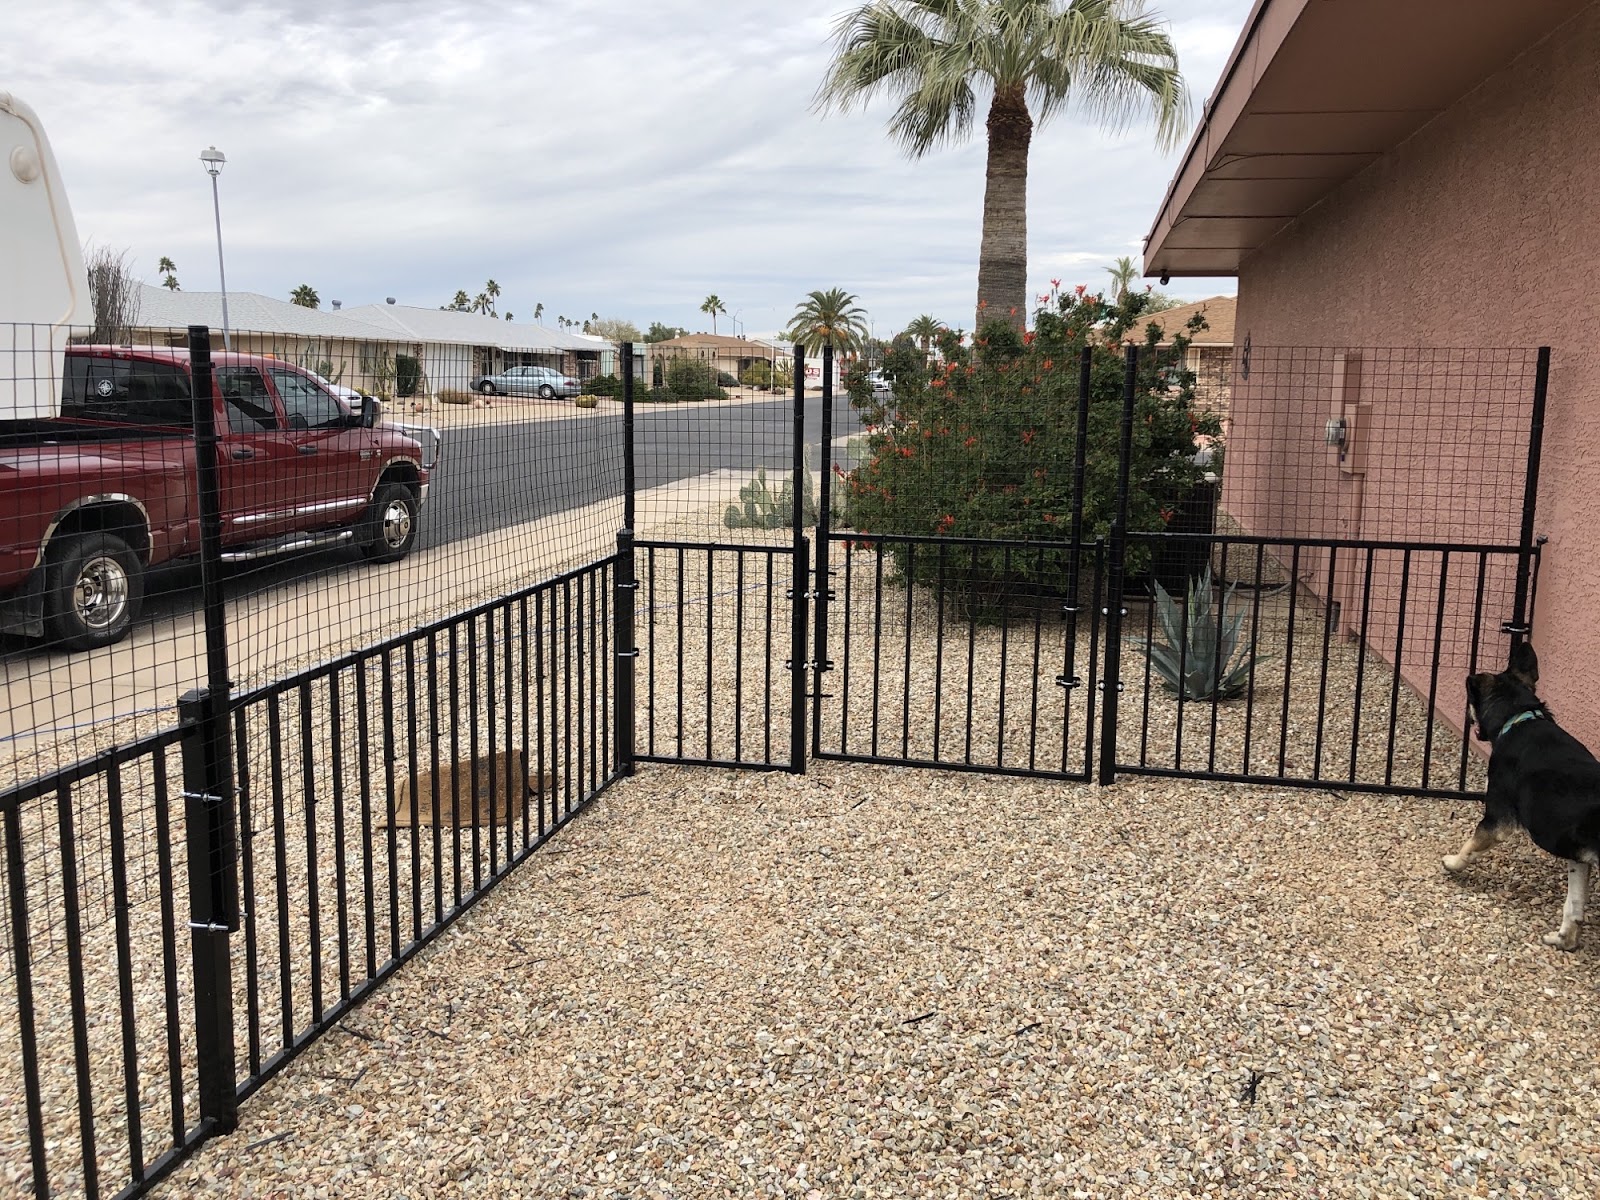
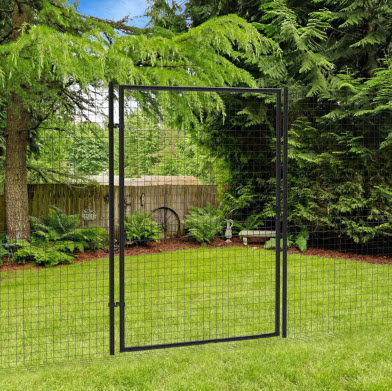
Gates
Freestanding Fence gates are available in 4.5 ft and 6 ft tall to go with the corresponding fence height. Because the 7 ft tall Houdini-proof fence is made from the 6 ft tall system, both will use the 6 ft tall gate. Available widths are 36” and 60” wide.
Gates are installed and built off of an existing fence post for the freestanding system. Then the welded wire is spanned across and cut around the gate door. The gate kit will include a second post for the latch side of the gate. Please note that this post is a smaller diameter than the rest of the posts for the 6 ft and 7 ft tall systems.
Gates within an existing fence can also be accommodated with either straight or curved fence extension systems. Exactly how a gate is outfitted will depend on the particular gate’s swing direction/configuration and location in the fence line. There are generally three primary ways to handle gates based on swing direction and the material (welded wire or poly mesh) being used.
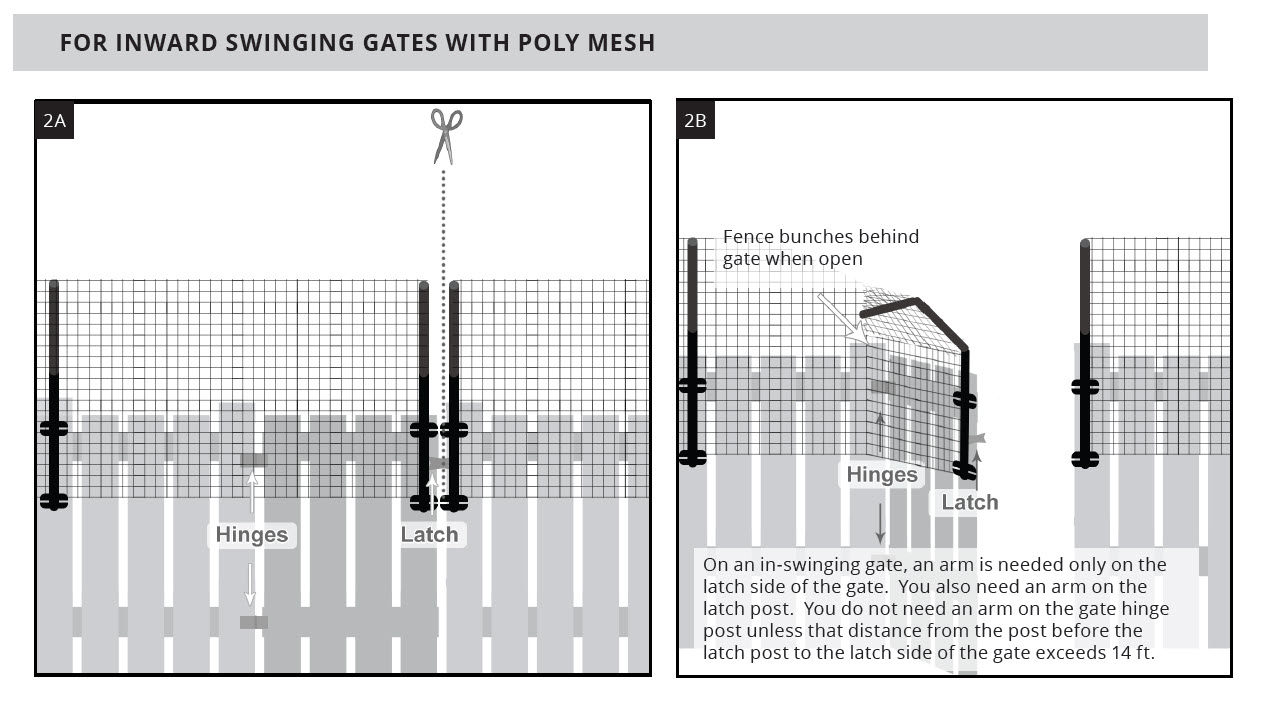
The gate swings inward and you are using poly mesh:
For an inward-swinging gate using poly mesh, you will need to install two extensions side-by-side on the latch side of the gate. One will be on the latch post while the other will be on the late side of the gate door. When the gate swings open, the mesh materials should bunch at the hinge side of the gate as it spans to the next extension on the fence line. Shown below with the Houdini-Proof Curved extensions, but the same concept applies to Straight Extensions.
The gate swings outward OR you are using welded wire:
For most outward swinging gates, you will need to install two extensions side-by-side on either side of the gate. One will be located on each post on both sides of the gate (one on the latch post and one on the hinge post). Then, the gate door itself will require an extension on each side of the gate door.
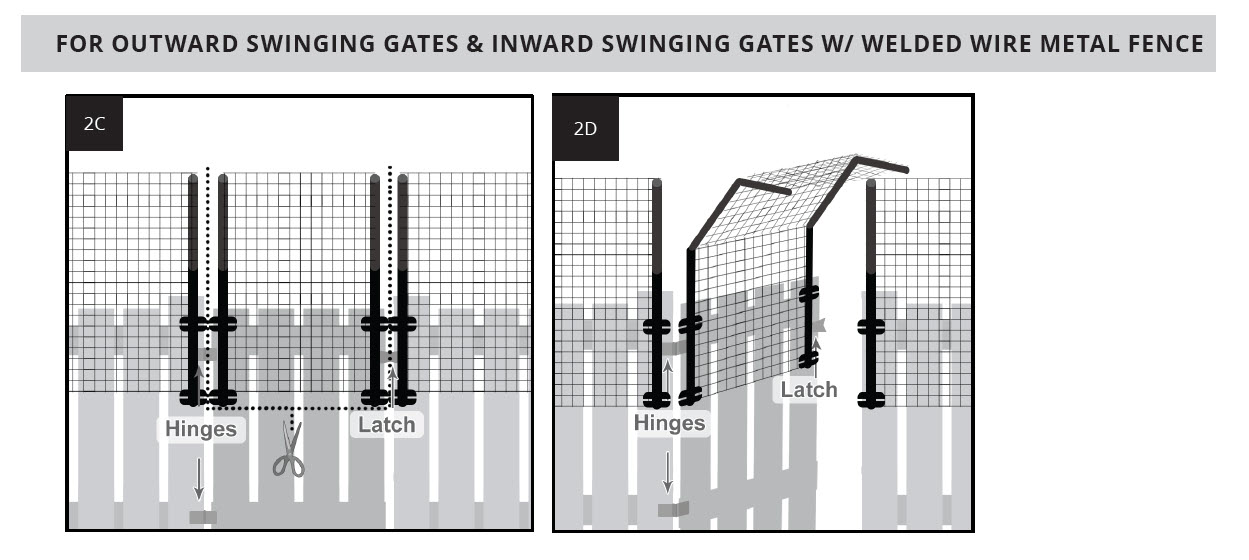
The gate has a header or a header will be built:
This option is great for gates that are in more difficult locations where it can be challenging to install the extensions (usually the Houdini-Proof curved extensions). A gate header is a structural addition that is built over the gate. Instead of securing the Dog-Proofer extensions to the gate itself, it is run over the top of the gate as if it were not there. Then, the gate can open freely underneath.
Transition Points when Combining Systems
Dog Proofer fencing solutions are extremely flexible to create a safe space for any dog, large and small. With options for dogs going over, under, or through an existing fence we’ve got you covered. For dogs with multiple modes of escape, or households with multiple Houdini dogs, you can combine Dog Proofer solutions as needed for the desired outcome. Read this article for more details!
Step 4: Build your order
Now that you have determined the total length of the perimeter of your enclosure and the total number of posts or extenders that it will require, you can start building your order. First, add the kit(s) that you need to your cart based on the total length of your fence. Next, if necessary, add any extra extenders or other components that you require beyond those included with your selected kit. We offer additional individual straight and curved extension arms as well as freestanding fence posts for all fence heights available in sets of 2, 3, 4, or 5.
Add Tools & Accessories
If you plan on purchasing a Freestanding Fence System, you can also add an access gate. As noted above, we have gates available in 36” and 60” widths for the 4.5 ft, 6 ft, and 7 ft fence systems.
Dog-Proofer Fence Systems were designed with the average “handy” homeowner in mind, so they do not typically require any specialty tools for installation. Basic tools are needed, but anyone familiar with DIY home projects would likely already have these in their toolbox. However, there are some tools that are available (and optional) that you might consider adding to your order.
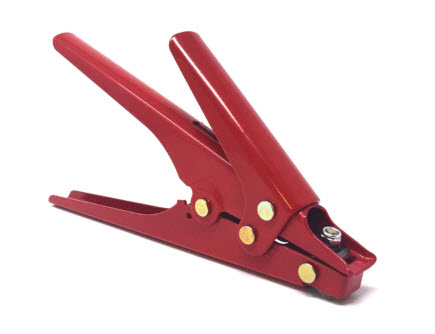
Multi-Purpose Snips: Heavy snips are a key tool for installing your Dog-Proofer Fence. They allow you to easily trim and cut the mesh materials and welded wire fencing.
Zip Tie Puller / Cutter: The Zip Tie Tool is a great idea for Dog-Proofer installation because it will securely tighten a zip tie more than most people are able to with their hands, AND it will cleanly snip off the excess tab of the zip tie after tightening. This is particularly helpful for our Straight Extensions to prevent mesh from “slipping down” over time. For large installations, it can save you a bit of time and hand fatigue. Please note that this tool comes complementary with our freestanding fence kits!
Hog Ringer Tool: This tool is a specialty stapler that is wonderful for Freestanding Fence installation or when installing the Conversion System on a chain link fence. The stapler includes “C” shaped staples that are pinched into an “O”. On the Freestanding Fence System, this tool can be used to secure the upper run of wire mesh and lower dig-proof wire barrier together at the seam. On chain link fences, it can be used to secure the loose bottom edge of poly mesh or welded wire to your chain link fence. This tool is another time saver!

Polypropylene String: It is recommended that our fencing systems are planned and laid out before beginning installation to ensure straight lines and a uniform look. The string tool can be used to keep Freestanding Fence posts in a straight line, but it can also be used to keep extension arms at a consistent height or slope.
Level: A level is a handy tool in most DIY projects. For the Freestanding Fence system, it is helpful to ensure posts are straight and plumb.
Staple Gun: This tool is used primarily for Extension System installations on a wood fence. The loose bottom edge of the mesh or wire fence material can be stapled in place against your wooden fence using a heavy-duty staple gun and staples.
Many of these tools are also pre-packaged into tool kits that offer additional savings!
Consult With an Expert
And there you have it! After following these 4 steps, you should be able to determine exactly which Dog-Proofer system(s) you need to secure your yard, and which kit size is best suited for securing your yard! However, we understand that every yard is unique and each yard brings its own challenges to the table. If at any point you have a question about how to address a certain area, our team of experts is always happy to help!